
Mid April: Plant Outside Now

This week we’ll discuss common issues that can afflict indoor seedlings and how to avoid them. Outdoors, we’ll answer two very important questions for installing a veggie garden: how much do I plant, and how far apart?
Just a reminder here: if you are new to gardening, don’t take on too much. As the growing season continues, there will be watering, weeding, and harvesting to stay on top of. Focus on a few easy veggies to care of this year, and expand on that next year.
We are focusing on the easier veggies in our spotlight section, but the best bang for your buck and time are the leafy veggies like spinach, Swiss chard, kale, lettuce, beets, mustard greens, and other greens.
Best of all, plants like these can be grown in the ground or in a container or window box!
Indoors
Two common seed-starting hazards are damping-off and spindly growth. Here’s what damping off is and how to avoid it. Next week we cover spindly growth.
Damping-off is "a disease of seedlings, occurring either before or immediately after emerging from the soil, characterized by rotting of the stem at soil level and eventual collapse." (dictionary.com) It is often a problem in cool, wet conditions where certain pathogens can proliferate.

Because we are trying to keep our soil moist for germination, it is at cross purposes with preventing damping-off. Here are some things that can help:
Use sterilized soil to start your seeds.
Use containers that have been sterilized in a weak bleach bath.
Water soil/seedlings from the bottom.
Sprinkle cinnamon on top of your soil after your seeds have germinated; it’s an anti-fungal and should kill pathogens that cause damping-off.
Garlic also has anti-fungal properties. Soak a clove of chopped garlic overnight in a quart of water. Strain the garlic pulp out and bottom-water your plants with this solution. Water with this solution every few weeks if you see fur growing on your soil.
Using a fan near your seedlings will increase air circulation, which helps with damping off. Check moisture levels a few times a day because a fan will dry them out quicker. More on why it’s good to use a fan next week.
It’s a delicate dance, this striving for moist-but-not-too-moist soil.
Soil Blocking
We have mentioned soil blocking in our previous posts. We consider soil blocking a next-level gardening technique, not a beginner activity. But it’s definitely something to look into if you have the basics of seed starting under your belt.
Soil blocking has been a game-changer for us. Here are the many reasons why:
It eliminates the need for those flimsy, plastic six-packs that are hard to clean, store, and reuse.
We can fit more seedlings at one time on our germinator heat mats, which is a space-saver on premium real estate.
The air around the blocks root-prunes the plant so they don't become root-bound, as in the plastic pots. More oxygen is distributed to the roots since the growing medium is not contained. The initial roots slightly dry out and stop outward growth, which spurs secondary root development, resulting in a well-developed, full root system for your plant.
The seedlings transplant without shock and get growing faster.
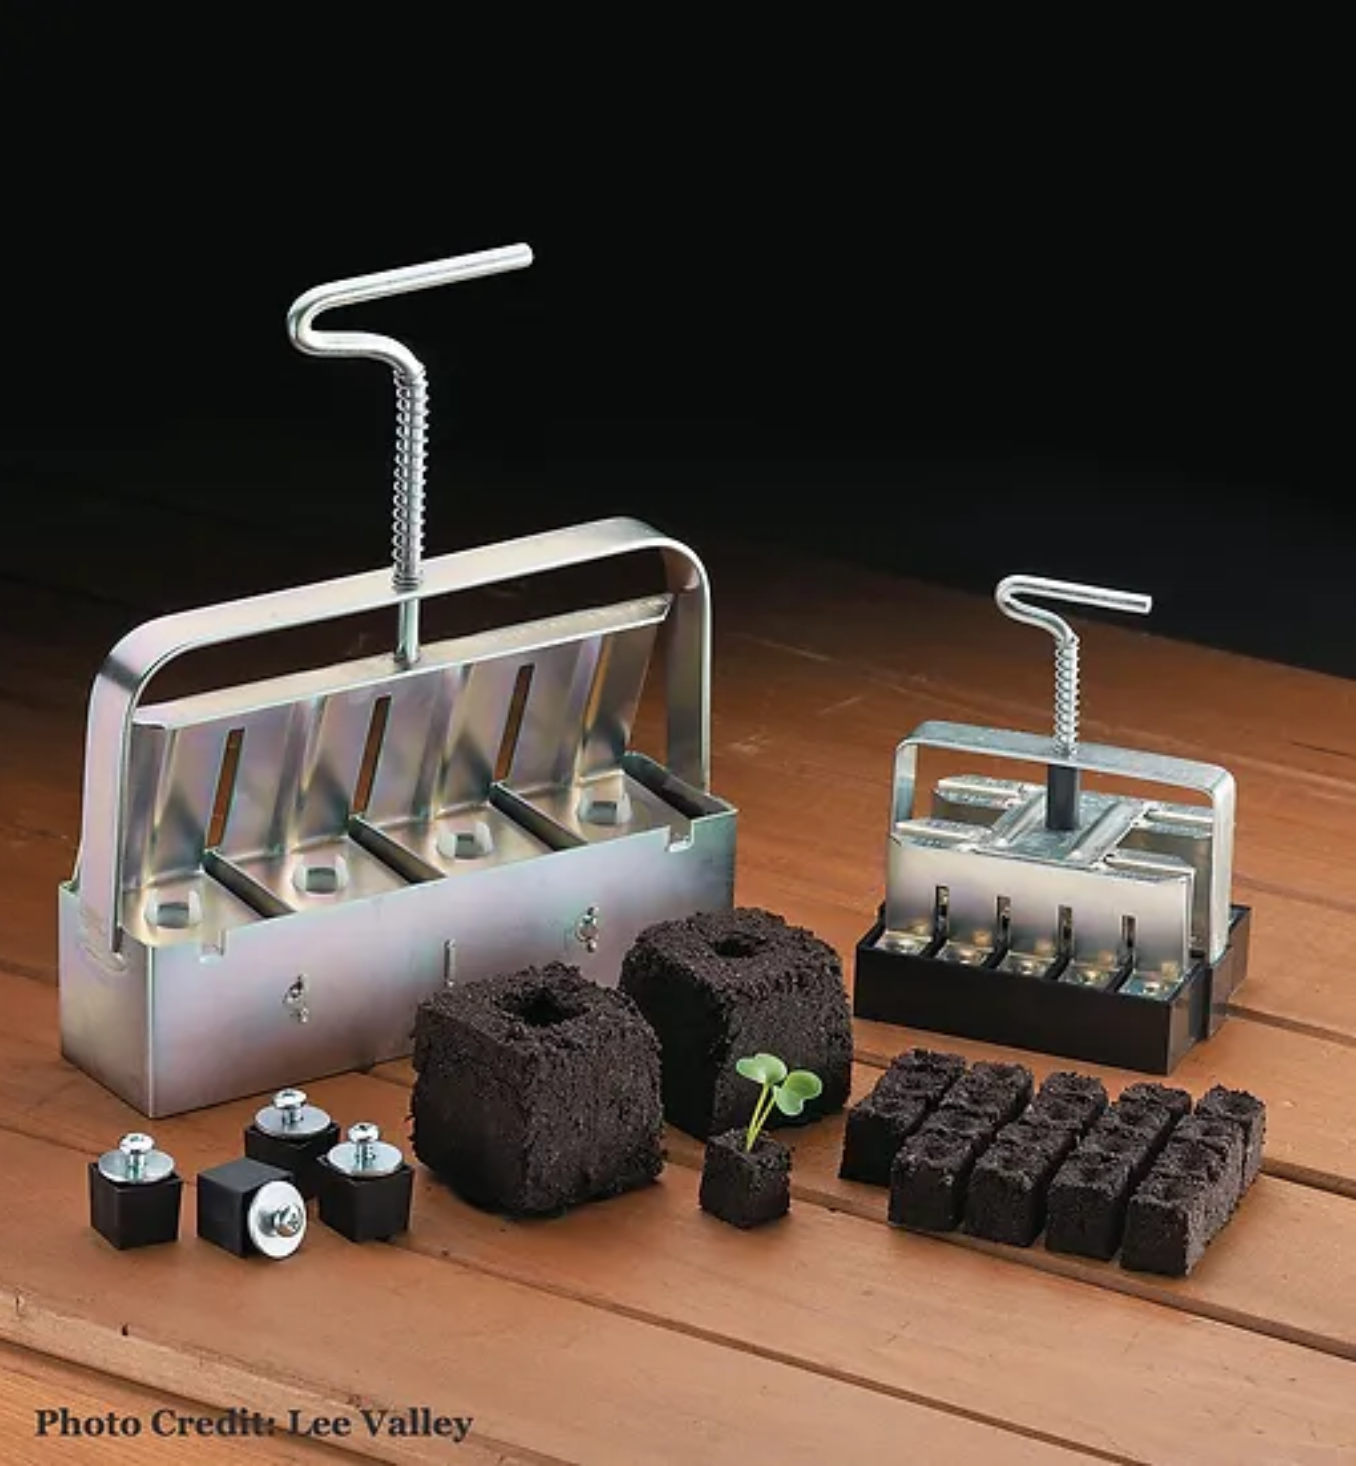
There are a few good videos and articles that are worth a look if you want to learn more about soil blocking:
Here is a quick video from The Gardener’s Workshop that shows how to use the smallest soil blocker.
This video is from Johnny’s Selected Seeds, which is where we purchased our blockers. They cost about $35 to $40, depending on the size.
This article by the Floret flower farm in Washington state has some very good instructions.
This article is from the soil-blocking guru Elliot Coleman's book, The New Organic Grower.
Outdoors
So here you are, standing in front of your prepared plot of soil (or container), holding a packet of seeds or a tray of seedlings, ready to plant. How exactly do you decide where to place them? What is the best seeding (or seedling) density? Here are some factors to consider:
As a general rule, it's best to follow the spacing guidelines on the seed package. Adequate space between your plants will reduce competition for light, will conserve water, and will provide more soil nutrition to each plant. Leaving more space between plants allows more sun and brighter light to hit plants as they grow, and this will result in a healthier plant. It also provides air circulation, which will help keep disease at bay. That said, you can adjust your spacing based on your conditions. If your soil is deep and rich, you can space about 10-20% closer and you will eliminate some weed competition.

When direct seeding your veggies, it is sometimes much easier to use a pelleted seed. Pelleted seeds are just normal plant seeds that have been coated to give them a round, smooth, uniform shape and size. This makes them bigger also. This is especially handy for very tiny seeds like carrots. Using a pelleted seed can reduce seed waste and the time spent thinning, and it’s just so much easier to see and handle.

The downside of pelleted seed is that it doesn’t last as long as the non-pelleted seed. If stored in a cool, dry place, non-pelleted vegetable seeds will last 3-5 years. But the pelleted seed is really meant to be used in the first year. The coating will absorb moisture, and the seeds won’t be viable after the first year.
What Should I Plant This Week?

Veggie Spotlight: Potatoes!
If you have the yard space, if you want to grow more storage crops for greater self-sufficiency, or if you just love potatoes, give them a try in your garden this year! They’re fairly easy to plant and care for, and given the right soil conditions (deep, rich and well-drained), they produce prolifically. They even grow great in containers. Once harvested, they store for months in the right conditions (cool and dry).

Potatoes aren’t grown from seed but from burying small pieces of potato with a sprouting “eye.” Get them from a reputable garden supply source and plant them in the next few weeks to ensure a long-enough growing season. Come summer, you can harvest golf-ball-sized “new potatoes,” or dig the whole crop after the foliage dies in the fall to store for the winter. Save some to plant again next year!

There’s lots of great information online for growing potatoes. This 3-minute video is a great introduction.
For more information on growing in containers, check out this handy guide from the University of New Hampshire.
For a deeper dive, and if you prefer narrators with British accents, check out this video here.
To Recap Today’s Essential Concepts
Keep seedlings soil moist but not too moist to avoid diseases.
Soil blocking may be a good way for you to up your gardening game.
Pelleted seed can be the way to go for those pesky, hard-to-seed crops.
Coming Up
Next week the focus shifts further toward preparing seedlings to be moved outside and preparing your outdoor space to receive them. Tune in as we discuss fencing and other seedling protection methods, and how sometimes seedling care involves oscillating fans.
Our Veggie Spotlight next week is carrots!
